How to DIY Disney Mouse Blinged Out Center piece
HOW TO DIY MINNIE MOUSE HEAD CENTERPIECE
 |
| My handmade super bling Minnie Mouse centerpiece |
After spending hours scouring the internet for DIY Disney themed crafts on my Pinterest Board account - TheSweetPinkParade, I came across a bunch of images like the one above for DIY centerpieces. I was originally looking for a simple craft that I could do in a day to decorate an empty space on one of my shelves. Even though this is technically a party centered craft, I put this little gem of an idea on my shelf. BTW- please excuse the messy shelf in the pictures that is just my craft supply hutch!
Now typically, these are a favorite for any little girls birthday under 10 years of age, but I had to admit my Disney loving heart was enflamed by the adorable-ness of these little mini sculptures.
If you go on my Pinterest and look at the DIY & Disney Theme Princess Wedding board, you will find pictures of my own personal creation, as well as, others. Do you like doing DIY crafts, Disney, Princesses, and weddings as much as I do? Then be sure to follow me on Pinterest!
Supplies:
Styrofoam Spheres/Balls (2 smaller balls of equal size, 1 that is much larger than the two smaller ones)
Wooden Skewers or Toothpicks
Strong Craft Glue
Hot Glue Sticks and Gun
Paint Colors of Choice
LOTS AND LOTS OF GLITTER
Puff balls, pipe cleaners, or decorations of choice
Check out my list on Amazon of supplies if you are not sure where to start or where to get them! http://a.co/9O13nOv
{Notes: I just want to bring it to everyone's attention that the items in my Amazon list are just suggestions. You can also get skewers, craft paint, craft glue, and at times even styrofoam balls from Dollar Tree depending on the time of year. But if you are like me and you pay for Prime and you don't like waiting for it to be Spring and Summer to buy $1 wooden skewers then Amazon might be the place for you. :) }
Before jumping into the directions: I quickly want to talk price. If you already own and have paint, glue, decorations, and skewers like I did then you are really just shelling out money for the styrofoam balls. Depending on the sizes you want or need for this craft affects your price point. For me this project cost an estimated $12 ~ 13 USD considering that I decided on impulse at Michael's Crafts to buy some small wooden planks to paint for a matching base. However, you can just use a piece of cardboard you have laying around the house!
I feel it is safe to say that if you have to start this project with buying everything brand new, it may not be the cheapest DIY as it would be around $30 considering a pack of assorted styrofoam pieces can be around $10 like mine was. Or you can also pay up $6.99+ per sphere depending on how big you want your centerpiece.
Also, I am borrowed some process images from Simply Being Abby who also did this DIY. She did her process very different from me by using spray paint (which I don't recommend) and pottery as a cute base. Only reason for borrowing is because I was too excited to start my new project and I forgot to take before and afters! #ohno
~~~~~~
Directions:
Directions:
- glue the largest styrofoam orb/sphere to your base of choice. I used a wooden plank from Michael's Crafts that came in a pack of 6 for around $3. I also made sure to paint the wood base BEFORE I glued my large sphere. Choose whichever color you like.

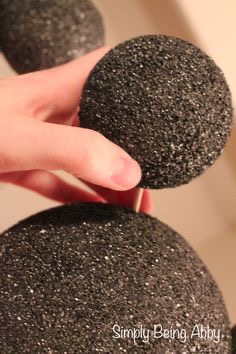
$2.29 on Michaels.oom - Once the larger orb is dry to the base. Arrange your styrofoam balls by using a wooden skewer to attach the two smaller orbs to the larger orb on opposite sides of the larger ball. I used a little bit of hot glue to help the two balls attach to the skewer because the wooden skewer alone was not secure. You need the skewer to support the small sphere. Hot glue does not stick well to styrofoam so be sure to go around the base of the smaller sphere with craft glue like I did.

Not my image, borrowed from Simply Being Abby - At this point your Spheres will already look like Mickey Mouse! Wait for craft glue to dry! Then move on to painting the sculpture (because yes that is what you have created!) whatever color you want with your paint of choice. Some people choose to use spray paint but be aware that spray paint can melt styrofoam!

Not my image. borrowed from Simply Being Abby - I chose to use a red-violet purple paint by Amsterdam and used two coats since the styrofoam is porous (meaning it has a lot of holes) it absorbs paint pretty fast so make sure to be generous!
- Right before the paint fully dried I dosed it with a purple glitter of my choice that I actually got from Dollar Tree! Then I sealed it with American Crafts- All Purpose Sealer

- Next now that everything is painted, glued, glittered and dried! Time to decorate! I used a purple pipe cleaner that I bent into a crown shape by hand and used a glue gun to attach. For fun I added some small puff balls that came with the pipe cleaners. You can decorate yours how you like. Synthetic extra sparkles added via photoshop of course


HOW TO DIY MINNIE MOUSE HEAD CENTERPIECE
|
| My handmade super bling Minnie Mouse centerpiece |
After spending hours scouring the internet for DIY Disney themed crafts on my Pinterest Board account - TheSweetPinkParade, I came across a bunch of images like the one above for DIY centerpieces. I was originally looking for a simple craft that I could do in a day to decorate an empty space on one of my shelves. Even though this is technically a party centered craft, I put this little gem of an idea on my shelf. BTW- please excuse the messy shelf in the pictures that is just my craft supply hutch!
Now typically, these are a favorite for any little girls birthday under 10 years of age, but I had to admit my Disney loving heart was enflamed by the adorable-ness of these little mini sculptures.
If you go on my Pinterest and look at the DIY & Disney Theme Princess Wedding board, you will find pictures of my own personal creation, as well as, others. Do you like doing DIY crafts, Disney, Princesses, and weddings as much as I do? Then be sure to follow me on Pinterest!
Supplies:
Styrofoam Spheres/Balls (2 smaller balls of equal size, 1 that is much larger than the two smaller ones)
Wooden Skewers or Toothpicks
Strong Craft Glue
Hot Glue Sticks and Gun
Paint Colors of Choice
LOTS AND LOTS OF GLITTER
Puff balls, pipe cleaners, or decorations of choice
Check out my list on Amazon of supplies if you are not sure where to start or where to get them! http://a.co/9O13nOv
{Notes: I just want to bring it to everyone's attention that the items in my Amazon list are just suggestions. You can also get skewers, craft paint, craft glue, and at times even styrofoam balls from Dollar Tree depending on the time of year. But if you are like me and you pay for Prime and you don't like waiting for it to be Spring and Summer to buy $1 wooden skewers then Amazon might be the place for you. :) }
Before jumping into the directions: I quickly want to talk price. If you already own and have paint, glue, decorations, and skewers like I did then you are really just shelling out money for the styrofoam balls. Depending on the sizes you want or need for this craft affects your price point. For me this project cost an estimated $12 ~ 13 USD considering that I decided on impulse at Michael's Crafts to buy some small wooden planks to paint for a matching base. However, you can just use a piece of cardboard you have laying around the house!
I feel it is safe to say that if you have to start this project with buying everything brand new, it may not be the cheapest DIY as it would be around $30 considering a pack of assorted styrofoam pieces can be around $10 like mine was. Or you can also pay up $6.99+ per sphere depending on how big you want your centerpiece.
Also, I am borrowed some process images from Simply Being Abby who also did this DIY. She did her process very different from me by using spray paint (which I don't recommend) and pottery as a cute base. Only reason for borrowing is because I was too excited to start my new project and I forgot to take before and afters! #ohno
~~~~~~
Directions:
Directions:
- glue the largest styrofoam orb/sphere to your base of choice. I used a wooden plank from Michael's Crafts that came in a pack of 6 for around $3. I also made sure to paint the wood base BEFORE I glued my large sphere. Choose whichever color you like.
$2.29 on Michaels.oom - Once the larger orb is dry to the base. Arrange your styrofoam balls by using a wooden skewer to attach the two smaller orbs to the larger orb on opposite sides of the larger ball. I used a little bit of hot glue to help the two balls attach to the skewer because the wooden skewer alone was not secure. You need the skewer to support the small sphere. Hot glue does not stick well to styrofoam so be sure to go around the base of the smaller sphere with craft glue like I did.
Not my image, borrowed from Simply Being Abby - At this point your Spheres will already look like Mickey Mouse! Wait for craft glue to dry! Then move on to painting the sculpture (because yes that is what you have created!) whatever color you want with your paint of choice. Some people choose to use spray paint but be aware that spray paint can melt styrofoam!
Not my image. borrowed from Simply Being Abby - I chose to use a red-violet purple paint by Amsterdam and used two coats since the styrofoam is porous (meaning it has a lot of holes) it absorbs paint pretty fast so make sure to be generous!
- Right before the paint fully dried I dosed it with a purple glitter of my choice that I actually got from Dollar Tree! Then I sealed it with American Crafts- All Purpose Sealer
- Next now that everything is painted, glued, glittered and dried! Time to decorate! I used a purple pipe cleaner that I bent into a crown shape by hand and used a glue gun to attach. For fun I added some small puff balls that came with the pipe cleaners. You can decorate yours how you like. Synthetic extra sparkles added via photoshop of course

Comments
Post a Comment